How To Light a Fire
http://www.sheffieldhistory.co.uk/forums/index.php?/forum/40-made-in-sheffield/
http://www.reclaimedflooringco.com/about/fitting/
http://www.soliftec.com/fascinating.htm
First lighting of the stove should be a very small fire with the flames well away from the sides of the stove. Ensure all the air ventilators are CLOSED to prevent the fire from roaring or over-heating. The stove should be kept burning low like this for 3 > 4 hours before gradually increasing the heat / size of fire over the next 7 days.
Allow 14 days gradual burning in of your new stove before full fires are used.
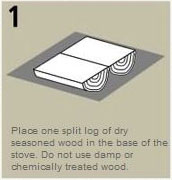
1
Put on work gloves and split some kindling from blocks of pine or fir, using a hatchet. To do this, stand a block on end on a hard surface, and split off sections with controlled strokes of the hatchet. Make enough kindling for three break-in fires, or about 30 pieces of kindling.
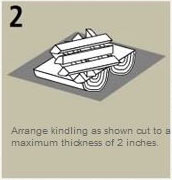
2
Open the damper on the chimney pipe, using the handle at the side of the pipe. If necessary, reach inside the stove and run your hand up the pipe to determine if the damper is open or closed.
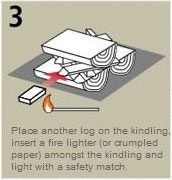
3
Wad some newspaper into a loose ball and place the ball in the center of the firebox in the stove. Place about 10 pieces of kindling in a teepee configuration over the newspaper. Light the newspaper with a fireplace match of a butane fireplace lighter and close the stove's door. Make sure the air vent on the door is closed.
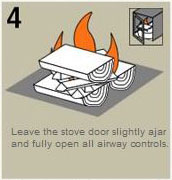
4
Allow the first break-in fire to burn out, and wait until the stove is cool to the touch. Wad another ball of newspaper, stack some more kindling in a teepee configuration and light another break-in fire. Allow this fire to burn out and the stove to cool, then lay and light a final break-in fire.
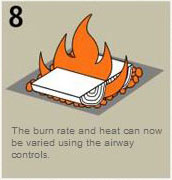
If you are burning mainly wood and find it burns too fast, try closing the bottom air flow controls. If wood in the stove continues to burn too fast remove the multi-fuel grate and also remove the ash pan. Burn the wood on a bed of the ashes remaining thereafter never full clean out the logburners, always leave some of the wood ash in place to protect the stoves base.
If your wood is not burning too quickly, keep the multi fuel grate in and control the fire by opening and closing the bottom air flow controls.
http://www.reclaimedflooringco.com/products/
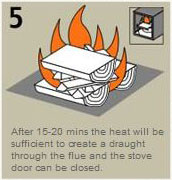
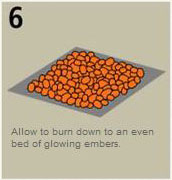
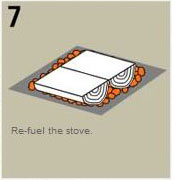
LIGHTING THE FIRE - is an art more than a science. With practice you'll have a roaring fire in an instant, but no-one, just no one, gets it right every time, so don't be ashamed if, occasionally, you just have to start again from scratch. The very best method is to clear the firebed of ash in the centre - it doesn't matter if ash is left around the edges, in fact, with wood this is highly beneficial. Check that the ashpan isn't so full that it might obstruct free entry of air, and empty it if need be. Place one or two firelighters (or a couple of balls of very dry, very tightly screwed-up paper) together in the centre and small dry sticks of kindling wood over the top of them. Light the firelighters, wait half-a-minute or so for them to become well alight, and gently tip plenty of dry, dust-free, medium-sized fuel over them and the sticks, so as to completely cover the whole firebed. Set all the air controls to 'full'. Close the door (if there is one) and you should have even the hardest fuel blazing away in minutes. The trick is to create a single concentrated heat source in the middle and make sure that all the air has to go through that. Putting lots of fuel on will ignite quicker as the initial flames are slowed-down by the fuel above them. It is important to try and cover the whole firebed as, otherwise, air might just be sucked through gaps rather than go through the burning material. If all else fails, there are such things as electric firelighters.
Empty the ashpan
If hot ashes start to pile up in the ashpan they come into contact with the lower side of the grate. Having the grate sitting in hot ashes can cause it to distort and lose shape.
Empty your ashes every day to avoid these problems.
Clean the glass
Most modern stoves are fitted with airwash systems to keep the glass clean. If yours isn’t, clean your glass daily with a specialist cleaning product made for use on stoves or by using newspaper dipped in malt vinegar.
Under no circumstances should you use an abrasive product to clean the glass. This will cause permanent damage.
Check for rust
Again, probably not a problem you will encounter with a modern stove, but it’s worth mentioning nonetheless. If you do spot any rust, it’s better to act sooner to nip the problem in the bud.
You can rub the rusted area with wire wool and then reapply stove paint to get your stove looking as good as new.
Clean the baffle / throat plate
The area on and around the baffle plate is a favourite spot for soot and other deposits to gather. This not only makes your stove less efficient by blocking the flue, it is also potentially dangerous. These are flammable materials, after all.
Stop this from happening by cleaning the throat plate once a week.
Check rope seals
You’ll find your stove has specialist firerope around the door. This heat resistant rope forms a seal around the door to ensure it closes properly and to prevent excess air from getting into the stove.
Over time the rope can become worn or squashed, letting in air and making your stove inefficient. You can check this every month or so, both visually and by trapping a thin piece of paper in the door. If the paper can be pulled out easily, the rope needs to be replaced.
Get chimney swept
Calling upon the services of a chimney sweep at least twice-a-year is a vital part of your stove maintenance. Failing to do so can lead to a build-up of creosote throughout the system and a subsequent risk of chimney fires.
It also reduces the efficiency of your stove, which brings additional problems.
Leave the door ajar during extended periods of non-use
If you’re not planning to use the stove for the summer or it’s going to be out of use for longer than a few days for any other reason, leave the door slightly open. This allows a flow of air through the system, which helps to stop corrosion.
http://blog.gr8fires.co.uk/2015/02/
Here are some ideas for removing dirt from your stove glass:
Damp cloth
The first port of call is a damp cloth. As with all the other cleaning
methods discussed in this article, it should only be undertaken when the
appliance is cool. Simply wipe the dark cloth on the inside of the glass in
circular motions. In some cases, this will be sufficient to remove the dirt.
Newspaper dipped in ashes
At first, ashes might seem like a bothersome byproduct of your woodburner.
In fact, they can be very useful. We discussed some
uses for wood burner ashes previously on this blog, and one of those
uses is cleaning stove glass. Once the ashes are cold, dip a piece of
newspaper into them, then apply it to the glass in a circular movement.
Devotees claim this is an effective way to remove soot. Wipe clean with a
damp cloth.
Vinegar
Vinegar is a useful cleaning product around the home, and many people use it
to clean their stove glass. Again, you just need to take a piece of
newspaper, dip it into the vinegar, then apply to the glass using a circular
motion. Wipe clean with a damp cloth.
Bicarbonate of Soda
Probably our least favoured option on the list, but worth a try if the
others aren’t working for your stove, is bicarbonate of soda or baking soda.
Simply add a small amount of water to it to create a paste, then apply to
the glass. Wipe clean with a damp cloth.
Stove glass cleaner
An easy way to remove soot from your stove glass is to use a specialist
stove glass cleaner. It is hard to beat this when it comes to convenience.
The product comes in a spray bottle. You just need to squirt it onto the
glass using the instructions given by the manufacturer, which usually
recommend a clean with a damp cloth beforehand.