 .
.
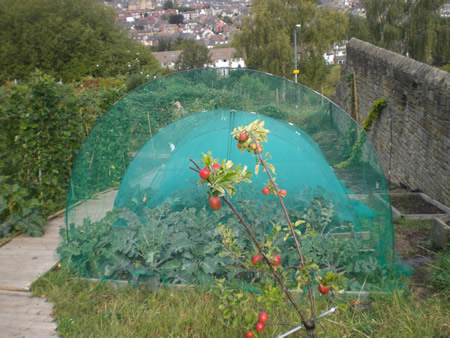

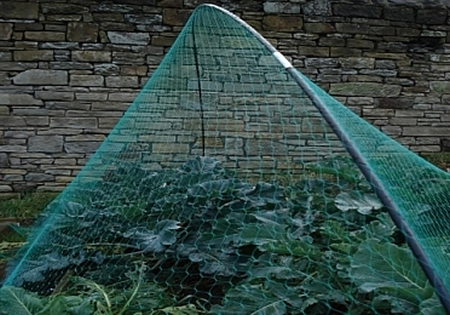
It's the cheapest and easiest way of constructing a cage.
It can be dismantled or moved very easily as well as constructed very easily. Two people can carry the cage to a new position. For overwintering crops I've often had something like five cages in use at once to protect brassicas. Some of these will have been used to protect fruit crops in the summer. One person can dismantle it and move it to a new position in a few minutes. Why continue to protect crops when the need for protection is over? The inflexible traditional cage makes this almost obligatory. Why continue to protect strawberries when your strawberries are no longer in danger of attack? Why continue to protect your raspberries or redcurrants when now it's your cabbages which need protecting.? The cage can be used to the full after the summer and early autumn crops to protect winter crops.
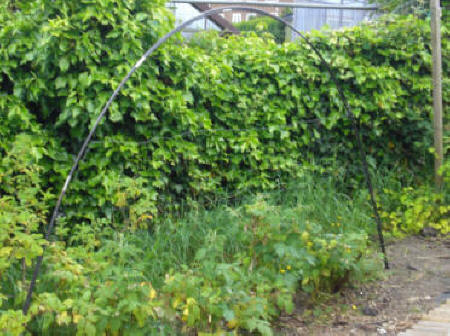
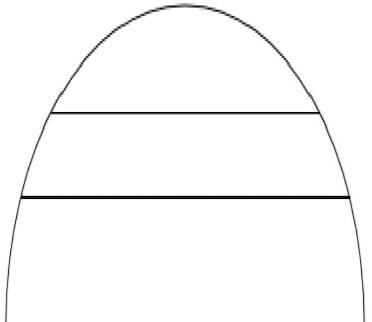
The dimensions of the cage can be changed very easily. In this way, too, it's far more flexible than the fruit and vegetable cages which are commercially available, or the smaller cages which have a series of hoops for support. More sections can be added to the flexible support to make it higher - up to about 3m high. The cage in the top photograph is a 'walk-in' cage. (The total cost, supports and netting, for a cage of this size is about £20.) Alternatively, a long section can be used which has a low arch, quite near to the ground, to protect low-growing crops - the lower the height, the greater the area which can be protected by the same netting. The same system can protect a strawberry bed and an apple or pear tree, although not a very large tree.
Appearance of the plant. Whatever the plant, it will look better without netting protection. Raspberries aren't the most beautiful of plants, but when they're growing healthily and vigorously they can delight the eye - if, that is, they're not simply glimpsed behind the netting of a fruit cage. Again, the traditional fruit cage, unlike this cage, can't be removed so easily.
Appearance of the cage. The traditional rectangular fruit or vegetable cage doesn't have particular visual strength. It simply sits there. The graceful, curving lines of these cages are attractive, I think, even though the plants without protection will always look better than plants with netting protection.
At times in the year when nothing at all needs protecting, it's far better that the cage should be dismantled and put away. This takes a prohibitively long time in the case of the traditional cage, no time at all my system. The reason for dismantling cages is that UV light harms the netting, shortening its life, and rain has a damaging effect upon poles. Manufacturers may claim that the netting is 'UV stabilized' and that the poles are specially treated, but there's no escaping the fact that being outside shortens the life of equipment.
Perhaps a minor consideration, given the mild winters in recent years, although some future winters may be very different - the sloping sides of this design shed snow, the flat netting which forms the roof of the traditional design doesn't, and can be damaged by accumulation of snow.
The design avoids other disadvantages of the commonly used home-made design. Commercially available fruit cages are used for taller crops. For less tall crops, gardeners have usually made their own netting protection system. An established method is shown in the well-known book by Dr D G Hessayon 'The Fruit Expert' (Page 59.) There are wooden stakes, or canes, which support the netting, which tends to sag at numerous places. Each stake is covered with an upturned plant pot. There are bricks at intervals to hold down the netting and prevent birds from entering. I've used this established method, and I found it so frustrating to use that I made an effort to find an alternative. Netting can be a frustrating material. It's easily caught on angular surfaces, including the plant pots used in the established home-made design. My design minimizes this problem, since the flexible support is curved, not angular.
The cage doesn't employ the fairly thick and heavy tubing of the traditional cage. This is an advantage, I think. There's a saving in cost and material, and a saving in material imposes less of a pressure on resources. A cage doesn't have to withstand great forces. It doesn't have to withstand great wind forces. Obviously, even gale-force winds can't blow the netting away. It doesn't have to bear heavy loads, except for snow. A lightweight structure is perfectly capable of doing the job, and a heavy, solid structure would be excessive. A building which uses slender, graceful columns or pillars rather than very thick ones to bear a load is in no danger of collapsing - it's using a sophisticated design to carry the load rather than an unsophisticated design.
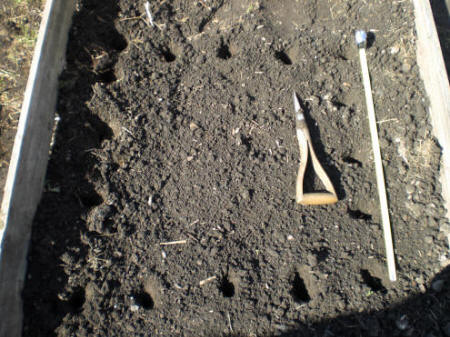
I tend to construct large cages and generally use netting of 6m x 4m dimensions. Netting of smaller dimensions can be used but whatever the length, the width has to be adequate - 2m is generally not sufficient.
The cage can be constructed perfectly easily, simply by pushing the ends of the support into the ground and using tent pegs to secure the netting, 2 at each end. Alternatively, small sections of bamboo can be used. With the two ends of the netting secure, work down each side, securing the netting to the ground at intervals. Again, tent pegs or small sections of bamboo can be used. These need not be visible later.
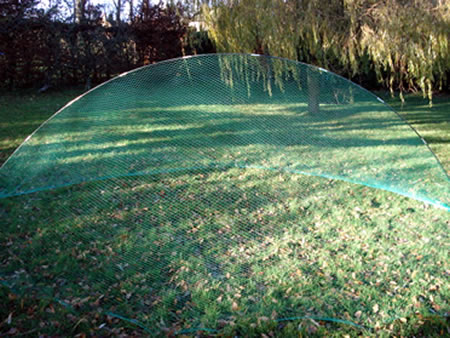
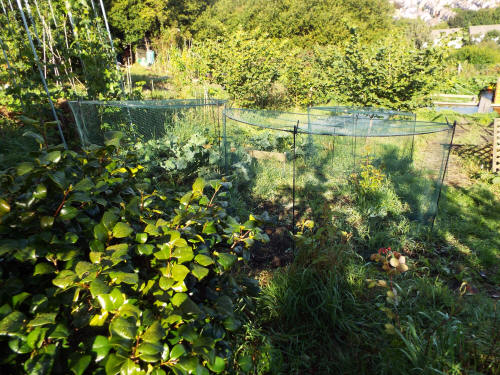
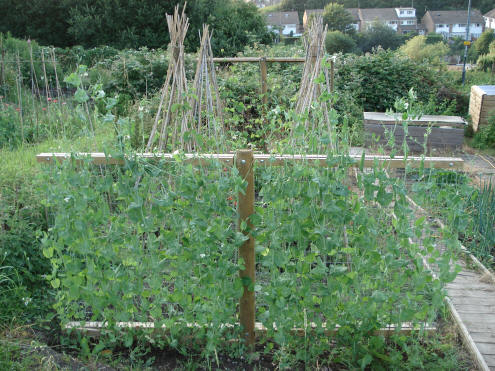
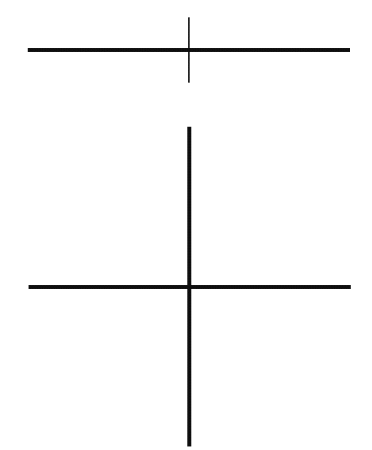
Two flexible supports of the same height or different heights can be used. The two supports can overlap or they can be placed further apart so they are no longer overlapping. The possibility of using single supports or two supports at varying distances apart gives the system great flexibility - very different lengths can be covered. Different widths can be covered too. If the same netting is used but the supports are lower, then obviously the netting can be brought out further at the sides. A second further flexible support can be used to make a cage of greater width, as in this image:
Whether tent pegs or small pieces of bamboo are used, the method of securing the netting is the same, if moveable boards are used to surround the bed. (See my page on boards for the system which I use.) Before the netting has been secured, it will be hanging down in front of the board, near to you. Lift the board slightly, push the netting underneath the board so that the netting is now on the other side of the board. Push down a tent peg or piece of bamboo on the inside of the board so that it goes through the netting. The netting is now secure at this point. Go on to the next securing point. Only a few are needed for the entire length of netting. When you've finished one side of the cage, push the board back down. The board secures the netting as well as the pegs or bamboo. In fact, when a board is used, the netting can be secured without using any pegs or bamboo at all. If moveable boards aren't used, then simply peg the netting into the ground. (The cage in the top photograph is secured without the use of boards.)
After the netting has been placed over the pole, I use four or five little loops at intervals, each loop about three inches long, made of string or twine. The loops are passed through the netting and round the poles, simply to stop the netting sliding. The loops keep the pole in the same position as regards the netting. If this seems confusing, then be assured that the cage works perfectly well without the loops. This is more a matter of neatness than functionality,
One disadvantage of the system has to be admitted, but in my experience
it's not at all an important disadvantage. There are metal connections in
the support. After a time, these will corrode to some extent so that it's
difficult or impossible to separate the sections of the support. I store the
support as a single long section, without taking it apart when it's not in
use.
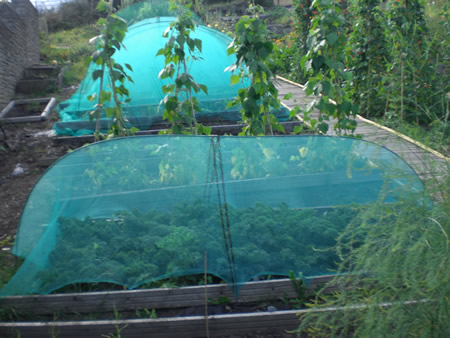
Protection: cylinders
Below, cylindrical protection structures, used to protect early purple sprouting broccoli and oriental vegetables. The netting is supported by plastic-covered steel fencing pins, with fibreglass tent poles bent into a circle above the vertical fencing pins. This form of protection is also shown in the large image at the top of my page Structures and techniques: composting, rainwater collecting.
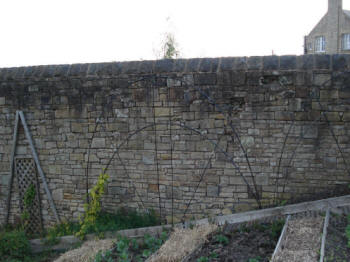
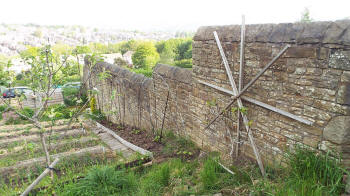
Prominent here is the wooden, straight-line support for the
grape vine, a trellis inside two diagonals. The other wooden
straight-line structure is at the top of the wall, a 'support star' for
a fig tree. Between these structures are three fibre-glass structures,
curved but with straight 'spokes,' to be used for supporting runner
beans. The lowest curved structure also supports a golden hop plant,
clearly visible. The linkage-contrast pattern is a b b b a. The vertical
posts in the foreground are to support autumn-fruiting raspeberry
plants. The boards at the boundaries of raised beds (here used for
growing broad beans and overwintering onion plants) are clearly visible. In the centre, the largest of the curved supports, with golden hop
growing up one of the curved elements.
The view downhill. Most prominent, the 'support star'
for supporting a fig tree. Visible at the base of each element of the
inner structures with curved perimeters, small runner bean plants.
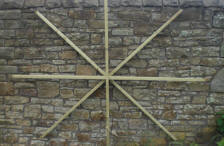
Above, support star, a versatile support for climbing plants, placed against a wall here.

Above, another view of support star, showing its construction. There are four slightly curved components, 1 horizontal, 1 vertical and 2 diagonal, making up 'spokes.' Each component is made up of two sub-components.
The structure can be used to support many plants. It's intended to be more than functional, to have visual interest not just in the growing season but throughout the year. When a deciduous tree planted and supported temporarily or permanently by support star loses its leaves, the structure adds visual interest to the wall. In construction, it's not as simple as it seems in the upper photograph. The spokes are made up of double elements with a gap between them. This tensions the pieces, increasing their strength, and also increases the visual interest. A front view is of a wheel without a rim. A side view is of something more like a piece of contemporary sculpture.
The structure is a better way of supporting a fig plant and many other plants than the use of wires, which have to be tensioned. Wires contract in cold weather and expand in warm weather. It's difficult to avoid unsightly sagging, unless straining bolts are used, which add to the cost of the sytem.. A trellis can be used for support, but a trellis which would cover this area is much more expensive than the system here, which only costs about 10 GBP in materials. The wooden pieces are 2.4 m long. It only takes a short time to construct and it's supported by the lower part of the vertical piece, with one fixing higher up to the wall. Whereas a trellis and a system using wires need two supports, this only needs one.
More spokes can be added if necessary. The extra spokes add very little to the total cost. A rim can also be added very easily, made up of wooden elements or, alternatively, one continuous loop of wire. To prevent the wire from sagging, a small straining bolt can be used - a system which uses horizontal wires needs multiple bolts. Other loops of wire can be installed, inside the outer rim. The system is provided with holes on the main spokes for fixing of additional wooden members or wire loops. All these additions give further securing points for plant stems, although the basic structure is likely to offer enough. An extension is provided for the vertical member, to anchor the structure in the soil.

See also curved supports for runner beans, part of a support cluster.
I use a rectangular support structure for growing runner beans, as well as garden canes. This is the rectangular mono-post support (it has one supporting post), with garden canes used near to it. On the rectangular support, the plants climb wires.
Another view of runner beans grown on canes in the lower allotment:
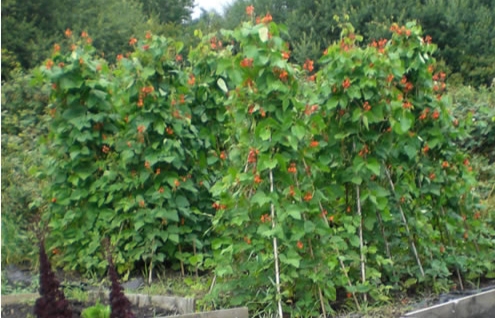
It takes quite a time for runner beans to reach this stage (the photograph was taken in one of my allotments a few years ago.) Whilst the seeds are germinating in the soil or beginning their climb towards the top of the supports, these supports are exposed. Like many other people, I use garden canes. People who can use rustic, gnarled supports of character need not worry about precision, but a degree of precision is desirable in constructing a support made up of canes. Otherwise, the supporting structure won't have the irregular charm of a rustic construction but will seem simply ugly. Constructing a support isn't craftsmanship, but it shouldn't be too casual and careless.
Fortunately, a degree of precision is very easy in this case. By using a suitable technique, the job can be carried out very quickly. I favour spires, that is, pyramidal structures, often called wigwams. To construct each spire (or wigwam) only takes about 5 minutes. The same principles can be used to construct other shapes.
This is the technique I use. Decide on the area to be used for a group of support-spires. Each support spire is 80 cm long by 80 cm wide. If the spires are to occupy a bed, decide how many spires can be fitted in, allowing some space between the spires, of course. There are five canes on each of the four sides, with 20 cm between any two canes.
Lay a tape-measure on the ground - it acts as a straight edge as well as a measuring device - and with a dibber make holes at 0cm, 20 cm, 40 cm, 60 cm and 80 cm. Make holes on the other three sides. If a dibber isn't available, a suitable stick can be used. All this can be done very rapidly. The holes made by the dibber will mark the positions of the canes but also make it easier to push the canes into the soil. Simply push the canes into the holes made by the dibber, tilting the canes towards the centre of the structure, and tie the canes towards the top with two loops of twine (just in case one loop breaks.) The procedure is, then, simply this: mark out the positions with the dibber, using a tape measure, push in the canes, tie the canes.
Below, in the foreground, a structure for supporting climbing peas (variety 'Alderman'), as with the rectangular support for runner beans (visible beyond it) a mono-post structure. The peas climb a galvanized metal grid.
The horizontal wires of the system not clearly visible here. The raspberry plants are young and have not yet grown as far as the lowest wire.
I still use a conventional post system for supporting raspberry crops, set up many years ago, but when I had to replace two old posts, I gave thought to the disadvantages of the post system, including the time it would take to anchor the posts solidly in the earth, and designed a system using curved supports, the supports used to construct curved cages. This system has many advantages.
This is the support, with horizontal wires for tying the raspberry canes.
Shapes with different curvature are easy to make, as in the case of
protection cages which use these flexible supports.
The curved support is put in place. The ends are simply pushed into the soil - there's none of the work involved in setting posts in the soil, whatever method is used. Two wires are attached to the flexible support at about 80cm and 110 cm from the soil. A tall support can be used, with a third wire 170cm from the soil (not shown here.) Alternatively, using a lower curved support, the raspberry canes are attached to the curved support itself when they have grown to this height, the system shown above. The system of curved supports is flexible, and can be used for rows of any length. For long rows, intersecting supports are used.
I've devised a simple method of fixing which adds effectively nothing at all, or virtually nothing, to the cost of the system. The curved support is smooth but this method of fixing prevents any slipping of the wire on the support. The tension of the flexible support gives tension to the wires, without the need for straining bolts.
This is a lightweight system but with more than enough strength to support raspberry canes. Much of the support comes from the stems of the plants, after all. They only need help.
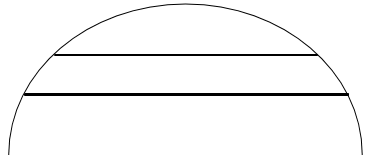
The simple system shown in the photograph at the beginning of this section is suitable for fairly sheltered locations, but a second support can be added, with greater curvature than the main support and of smaller diameter, at right angles to the main support. It prevents lateral movement of the main support in strong winds. (The system will withstand gale-force winds - but not hurricanes.) In a site with a little more space, a system with two identical supports can be used. Looking at the supports from above, the upper diagram here shows a main support with a thinner subsidiary support. The lower diagram shows two equal supports, giving four branches for support of raspberry crops.
If protection of the raspberry canes is considered essential, then a second, longer curved support is added, with netting, and the raspberry support is within a curved cage,
In the conventional system of supporting raspberry canes, which uses posts, the erection of the posts is the most laborious stage. Use of a concrete mixture such as 'Postcrete' involves transportation of heavy material, a spiked support such as 'Metpost' has to be hammered into the soil and both methods need care if the post isn't to be too far from vertical. If straining bolts are used, then holes have to be drilled in the posts, of course, and the bolts add to the cost of the system. The productive life of raspberry canes is far longer than that of strawberries, about ten years, but time passes ... This system can be dismantled and erected in a new area in a matter of minutes. Dismantling the conventional system is much more difficult, involving removal of the the posts and getting the spiked support or the concrete out of the ground.
Alternative support and protection: raspberry plants
I use the cage system described above for protection of brassicas - essential on my allotments - and for protection of redcurrant and whitecurrant bushes. I haven't found it necessary to protect the raspberry crop, or the strawberry crop, for that matter, but other people's experience may be very different. Dr D G Hessayon writes of soft fruit, in 'The Fruit Expert,'
'Raspberries and strawberries are the types most at risk. Chemical sprays are of little use [the author has a great fondness for chemical sprays, not to be imitated] and mechanical bird scarers are of limited value. The only satisfactory solution is to erect a bird cage. For strawberries and low-growing bushes and canes a temporary cage will do, but for standard-sized bushes and canes a walk in cage is a better idea.'
Information about his 'temporary cage' is given above. My system which uses curved supports is vastly superior.
For raspberry crops, not a low-growing bush, of course, I give an alternative to the walk-in cage, one which is far more cost-effective.
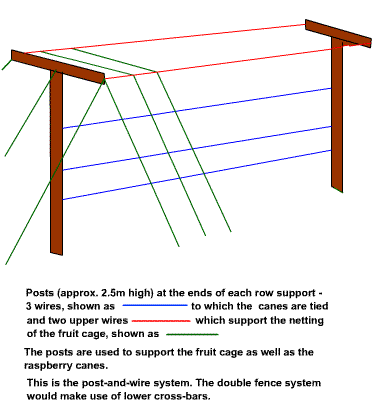
In 'traditional' systems of supporting and protecting raspberry plants, support is separated from protection. To support the plants, leaving aside the single post system, which is inadequate for more than a few plants, either the post-and-wire system or the double fence system is used. For the post-and-wire system, the uprights at the ends of each row are typically about 2m high, for the double fence system the uprights are a little lower. If it's decided that it's necessary to protect the crop against the extreme damage that birds can do then by far the best solution is to erect a cage to protect the crop. So, a large cage, with its own supports, is either bought or constructed. The cage consists of a framework made of horizontal and vertical members with netting attached.
I still use a conventional post system for supporting raspberry crops, set up many years ago, but when I had to replace two old posts in one row of runner bean plants, I gave thought to the disadvantages of the post system, including the time it would take to anchor the posts solidly i the earth, and found that it was possible to replace it with a system using a curved support. This has many advantages.
If the conventional post system is used and protection of the crop is found to be essential, the support system is integrated with protection. There's no reason to erect a supporting system for the canes and then to erect a second, independent supporting system for the netting which protects the raspberry canes. Fruit cages are expensive, and a significant part of the cost comes from the supports. This is unnecessary duplication.
The vertical posts at the ends of each row in my system are higher than the vertical posts generally used in the traditional systems. They are about 2.5m high and have at the top short horizontal members about 1 metre long, like the short horizontal members of the double fence system. This is because attachment of the galvanized wires to which the canes are tied or which support the canes isn't their only function. These posts are also used for attachment at a higher level of two galvanized wires, running the length of each row, over which the netting is draped. These galvanized wires, like the lower wires, are secured by straining bolts. The netting is tied to the wires at intervals with small loops. The edges of the netting at ground level are secured with tent pegs. The whole system represents a very big saving in time and money.
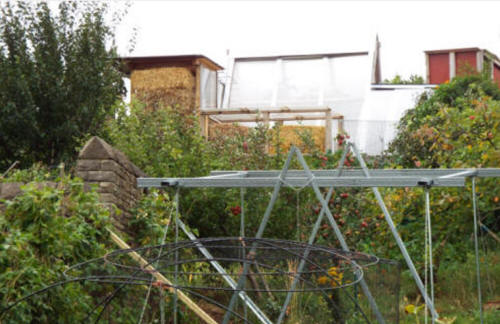
Support structures can be light and flexible, such as the curved fibreglass
poles shown supporting insect netting in the photos to the left, or heavier
and more substantial, such as the very versatile structure shown above, a
prominent part of the lower allotment. Here, the structure has been fitted
with the black interlocking fibreglass circles which form a support for
netting. The netting protects the brassicas growing in the plot beneath them
from pigeons and other birds. The structure itself can easily be used as a
larger netting enclosure for crops growing in the ground beneath the
structure.
It has now been fitted with a connector piece at the level of the
higher components, as shown in the next image. The connector is a ladder - a useful place to store a
ladder and a useful supplementary function for a ladder. It can easily
be removed, and the structure stands without any difficulty without it. (See
also another use for a ladder, a much heavier and more substantial one than
the ladder shown above, as the support for a walkway and a water collecting
surface. Images and information in the section for the year 2018 on the page
Gardening/structures: photographic
introduction.)
This metal structure has been used for various purposes:
Covered
with insect netting for protection of plants from pests - a useful fruit cage
or vegetable cage.
As a support for broad beans, using the lower
horizontal bars shown here,
/DSCF1965.jpg)
As a support for winter squash plants, using the lower horizontal bars
(the green containers on the bars are to support the weight of the squash
plants.)
The structure can also be used to support climbing plants -
runner bean, Borlotti bean and French bean - using slender chains hung from
the higher bars.
A substantial fixed structure like this can also be
used to support other structures, in part. Here is a horizontal structure
made of flexible fibreglass poles fixed to one side of the metal structure.
The fibreglass poles support anti-pigeon netting.
/DSCF1828.jpg)
/DSCF1823.jpg)
The anti-pigeon netting is to protect purple sprouting broccoli from
attack by pigeons. I've discontinued the use of fine mesh insect netting,
because I dislike its appearance and find it no trouble, or not much
trouble, to examine crops for signs of insect damage, mainly from cabbage
white butterfly caterpillars.
The metal structure itself can't be
used to protect growing brassicas every year because of the need to rotate
these crops. The brassicas growing in the images here are growing below the
metal structure, in the fibreglass structure firmly fixed to the metal
structure. After this, brassicas can be grown uphill, above the metal
structure, again, in a fibreglass structure fixed to the metal structure.
So, the same structure is useful in a three year rotation. More images of
the fibreglass structure in the section on the year 2018 on the page
Gardening/construction: photographic
introduction.